
In a recent project, where we built a CI/CD platform, we were asked to develop a load testing engine that could be easily integrated and executed as part of the pipeline.
Load testing is a very important tool for assessing your system’s Quality of Service (QoS) in different conditions: it allows you to model how much traffic can be handled, as well as predicting how your system behaves under load.
The Problem
We were helping the client launch a new version of their application, running on a brand new infrastructure setup with new observability tools.
The client was being very ambitious, with lots of features being developed and a lot of changes being implemented. As a consequence, the product had evolved without major performance considerations, so we wanted to ensure that the new version would handle production-like load once it was time to go live.
The Solution
We started by defining the solution’s key requirements:
- Maintainability — Someone new to the project has to be able to quickly understand and evolve the existing solution. Because of the nature of our job as consultants, we always keep in mind that we won’t be around to maintain the project after its assembly.
- Scalability — A load testing engine is only useful if able to produce large amounts of traffic. It should be able to scale linearly with the resources available.
The image below describes the solution. Let’s further analyse its architecture.
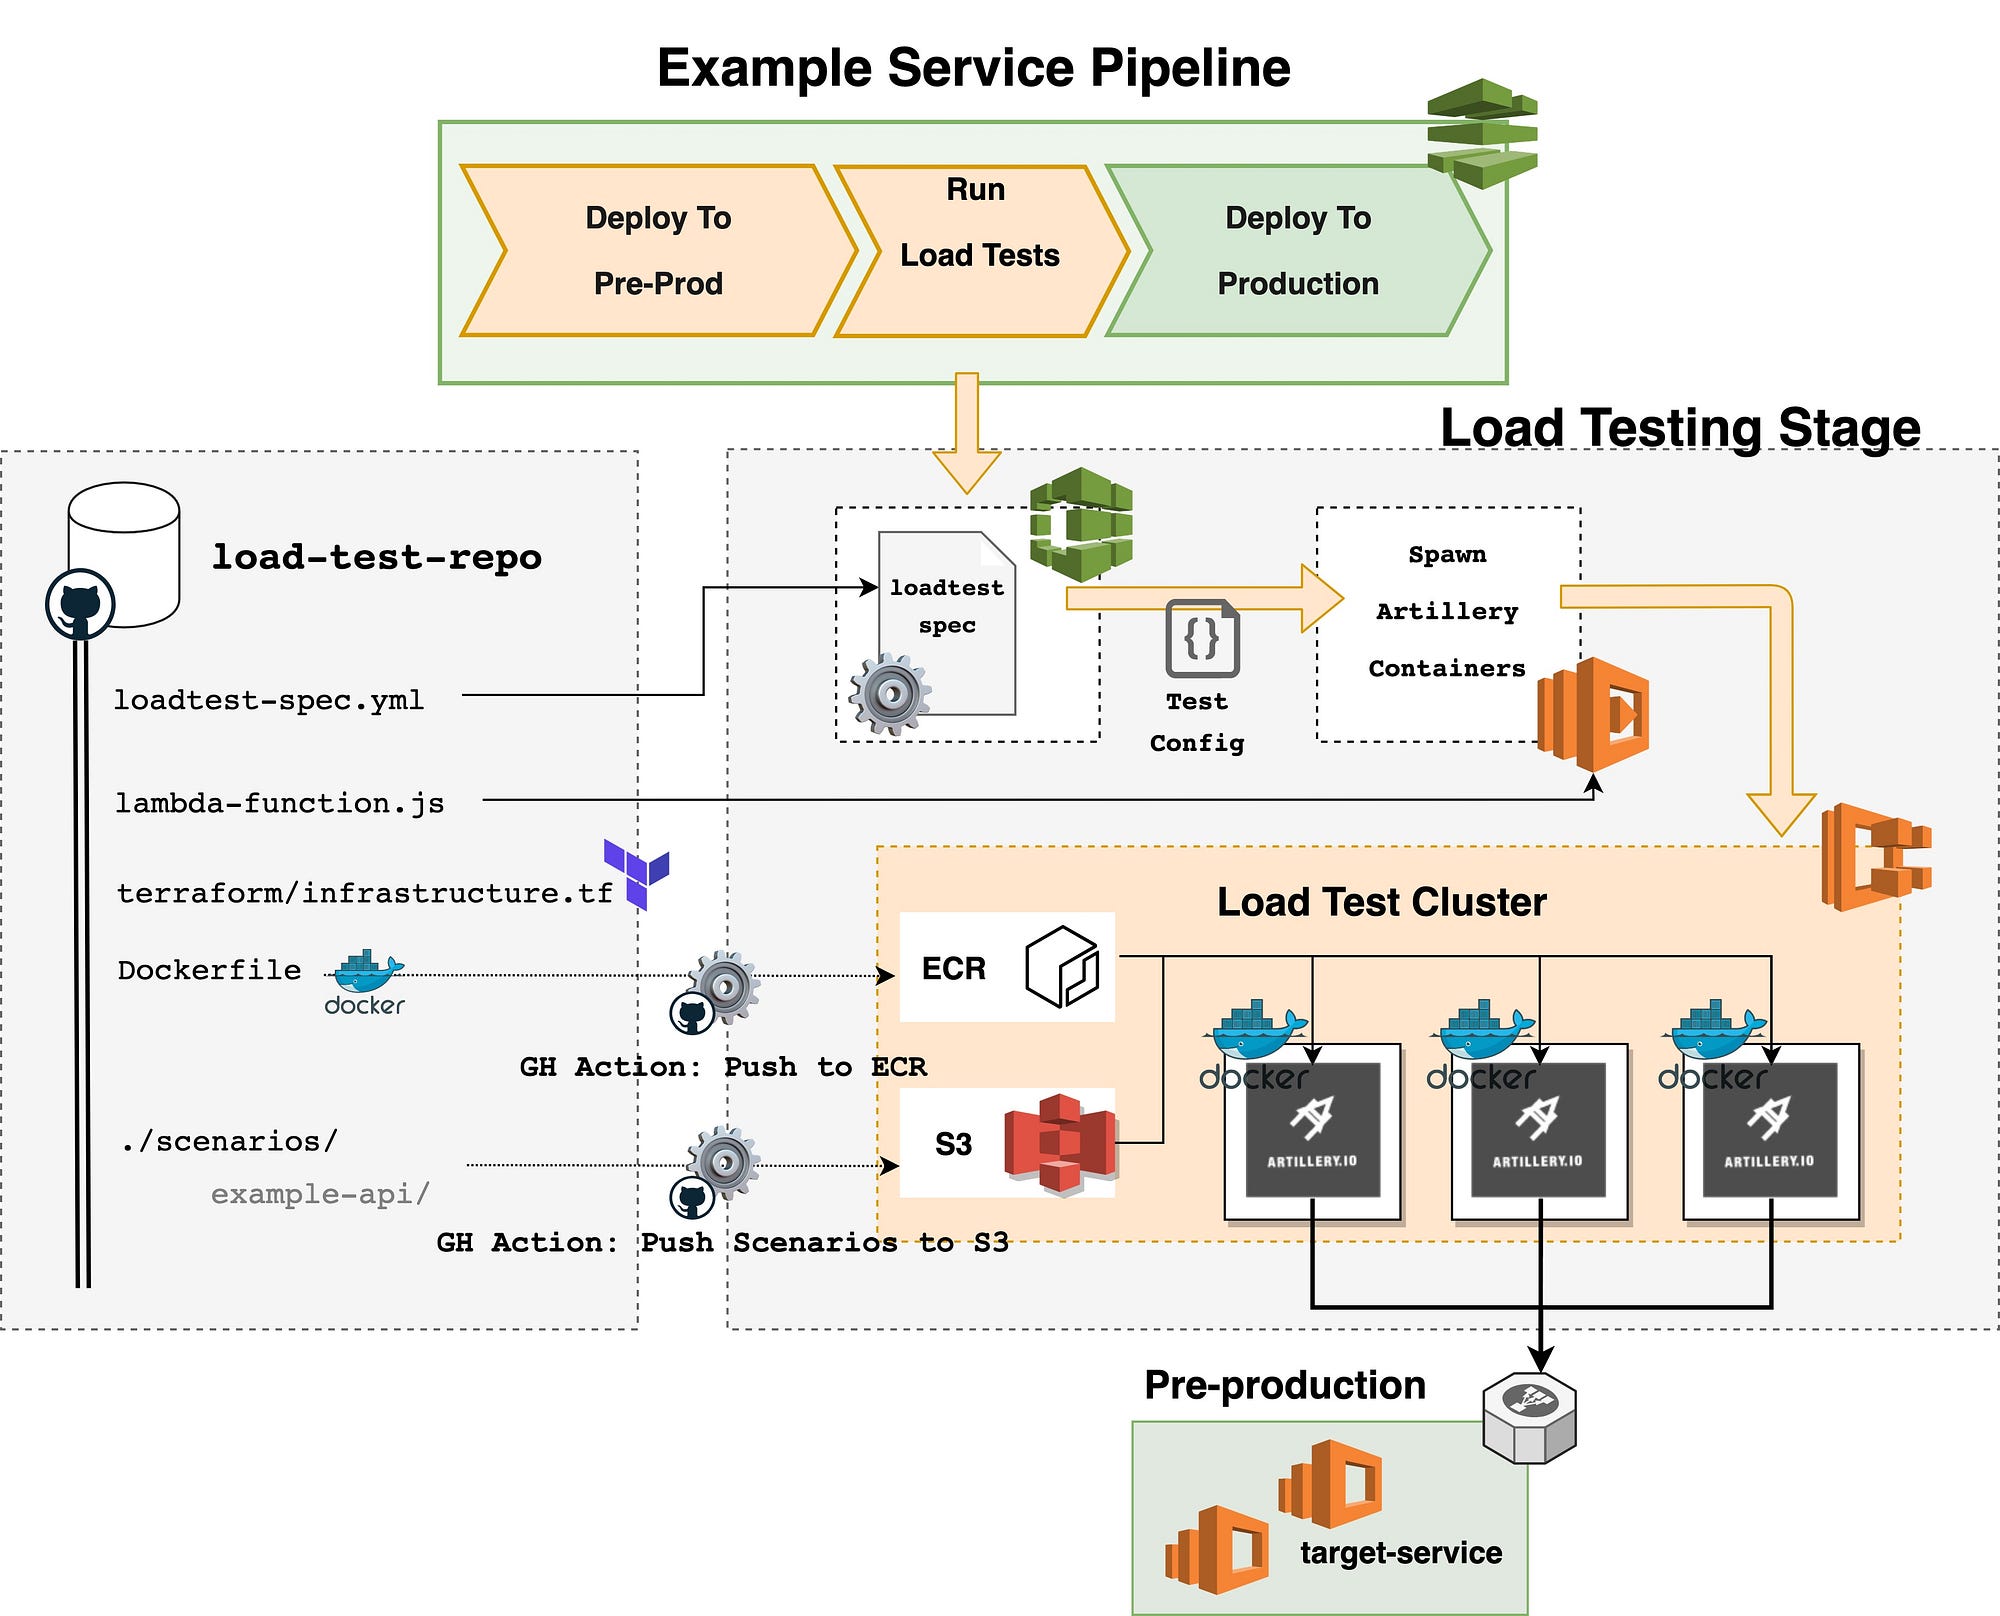
Test Runner
We chose Artillery to execute the load tests as it is lightweight, flexible and requires minimal setup. It also allows us to write test scenarios using templated YAML, which makes them easy to read and, in most cases, easier to write (see code sample below). This was very important considering that we wanted to keep the barrier of entry the lowest possible. We found the different development teams struggling with ownership of their services, thus this was a major concern for us.
Each service had a folder containing all the configuration and payload files needed to run the tests for that service. This helps the different teams understand what is their responsibility to maintain and makes it easier to package, and once needed, ship this bundle to the load test container. Below you can find the structure for an hypothetical service.
Considering the amount of services we had, keeping all the services configuration under a single git repo was the best option. We kept not only the scenarios in that repo, but also the rest of the configuration files required to build the rest of the infrastructure.
The scenarios were automatically synchronised to a S3 bucket using a GitHub action. The same technique was used to build and push to ECR the Artillery docker image. The simplified Dockerfile would look like this:
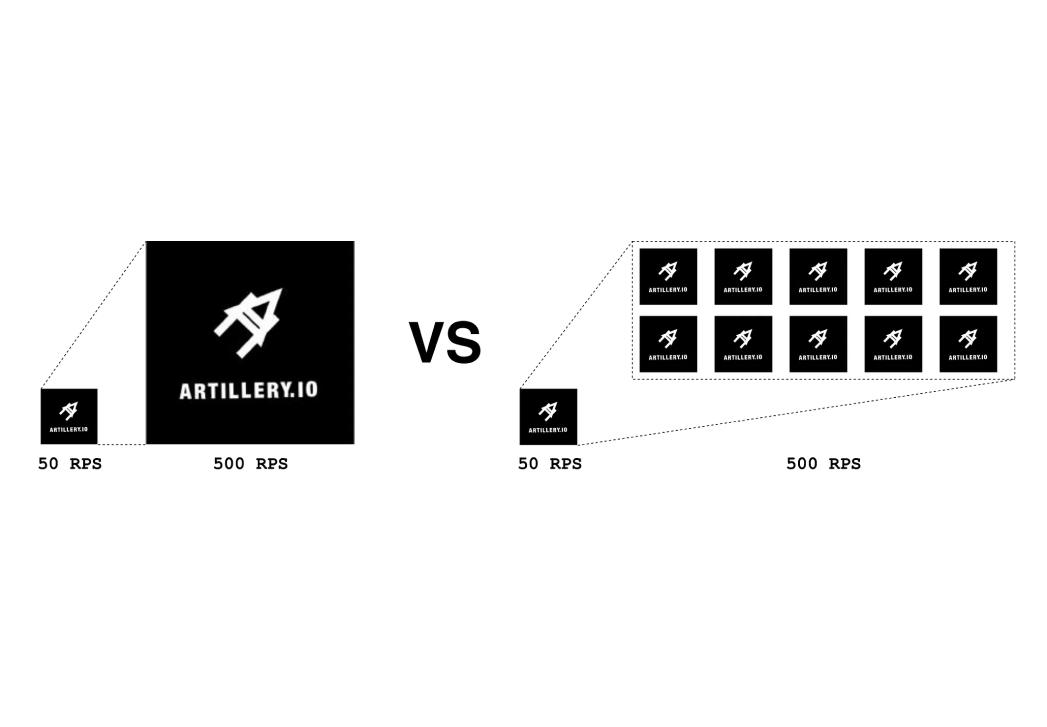
Scaling The Load
As with micro services, when scaling Artillery load tests, we don’t want to scale vertically. Instead, we want to increase the number of containers running the load tests. However, blindly increasing the Requests Per Second (RPS) that the container generates would undermine Artillery’s ability to create load, making it fire High CPU warnings. Instead we keep that fixed and specify how many replicas we want to run for each service, effectively scaling the load.
We created an ECS cluster with a VPC to the service’s network to help orchestrate this procedure. We deploy a configured number of Artillery Tasks through a Lambda. Since these run on Fargate, it gives us virtually infinite load generation capacity.
CI Integration
The missing piece that connects all the dots together is the CodeBuild step. All services had a CI pipeline built on AWS CodePipeline, so we just had to add a CodeBuild step after each deploy to preproduction in order to trigger the load tests on each build. This Codebuild step brought along some helpful features:
- It carries the service’s configuration, which gets passed on when calling the Lambda function that deploys the Artillery containers.
- It runs as part of the service’s CodePipeline. Because of its nature it automatically locks the load test stage, preventing multiple test executions against the same service from running simultaneously (which would skew the final run’s results);
- The same CodeBuild instance runs a single time throughout the whole load test. This makes it a great place to execute the setup and teardown scripts, ensuring these run exactly one time— beforeAll & afterAll hooks.
A simplified version of the CodeBuild spec file is described below.
Conclusions
This project was extremely exciting to work on. Not only did we utilise novel and refreshing tools, but also were we able to help the client identify and fix some critical performance issues even before they went live. Furthermore, we were very pleased to see that the teams maintained and updated their own load tests independently. This means that we were successful at making these accessible enough.
Apart from our successes, there were also some opportunities for improvement:
- We started testing later then we should. Had we known that we’d be exposing so much by running the load tests locally, we could have prevented developers from stop working on features to tackle these problems later on.
- We had to write the first set of tests for all the services we integrated with. This gave the teams a starting point to iterate over. It is a tedious process and involves a lot of communication to understand the service. If carried from the start, there is no need to put this burden on the reliability engineers shoulders and the more informed developers can build them by themselves.
- One potential shortcoming of our implementation is that we’re not actually testing the production environment. Testing a production-like environment is a great start, but you cannot be 100% sure. Testing in production involves some more complexity though. Your tests cannot tamper with existing data and shouldn’t either leave “zombie” records in the DB. To account for this we created the setup and teardown steps to allow the teams to modify ephemeral records that are deleted after the load tests.
Key Takeaways
- Start testing as soon as you can. We only started load testing the services when we were close to the go-live date, this costed us precious time and forced some of us to stop development all together to address the issues.
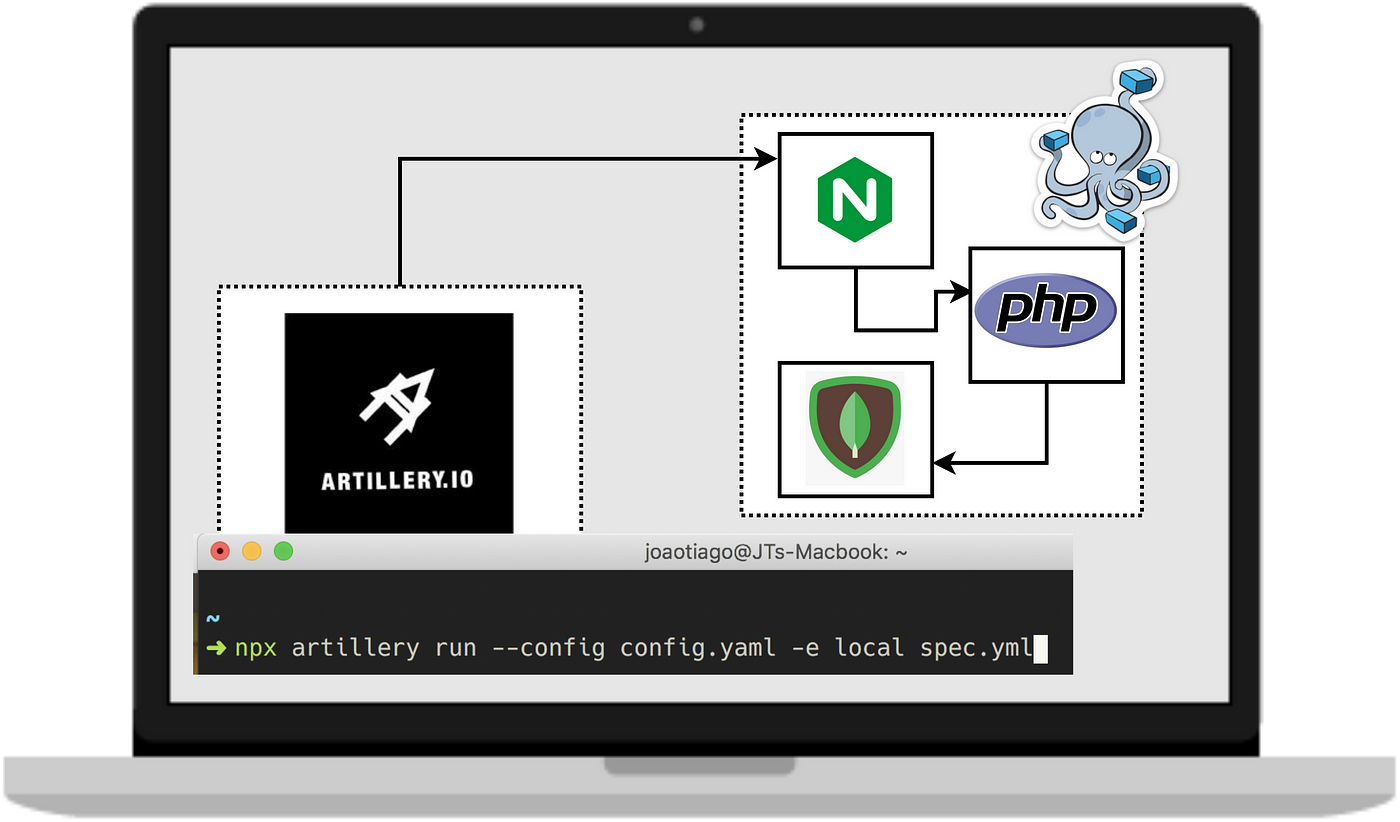
- Run the load tests locally. For some services tested, we realised that testing them locally, although it wouldn’t assure production grade performance, it would be enough to expos the first set of bottlenecks we faced. It was also beneficial to have a short feedback loop once fixing those issues.
- Make load testing part of your CI pipeline. This way you can ensure that a deploy won’t impact production’s performance and easily find the ones that do. You should do this even if you don’t have a Service Level Objective (SLO) you should comply with.
- Make writing load tests part of your development lifecycle. Just like writing integration tests and documentation, make it a requirement to keep the load tests up to date with the API’s latest interface. It’s up to the service developers to own and maintain the load test specs.
- The best way to test production, is by testing production. It may sound obvious, but it is true.


